Ultimate Jeep Wrangler Lift Kit Installation Guide
Jeep Wrangler lift kit installation guide

Ultimate Jeep Wrangler Lift Kit Installation Guide

Transform your Jeep Wrangler's capabilities and appearance with this detailed, step-by-step installation guide.

Start Your Lift Today

Key Takeaways

  • ✓ Proper installation ensures safety and performance.
  • ✓ Tools and preparation are crucial for success.
  • ✓ Professional alignment is required after installation.
  • ✓ Lift kits enhance off-road capability and tire clearance.

How It Works

1
Gather Tools & Prepare Vehicle

Collect all necessary tools and safety equipment. Park your Jeep on a level surface, engage the parking brake, and disconnect the battery.

2
Disassemble Stock Suspension

Safely lift the vehicle, remove wheels, and meticulously detach the factory shocks, springs, sway bar links, and other components as per your kit's instructions.

3
Install New Lift Components

Carefully fit the new lift springs, shocks, control arms, and any other kit-specific parts. Ensure all bolts are torqued to manufacturer specifications.

4
Reassemble & Final Checks

Reattach wheels, lower the vehicle, and perform a thorough inspection of all installed components. Drive slowly to a professional for a mandatory alignment.

Understanding Your Jeep Wrangler Lift Kit Components

Detailed view of a car's rusty suspension system during repair in a garage. 
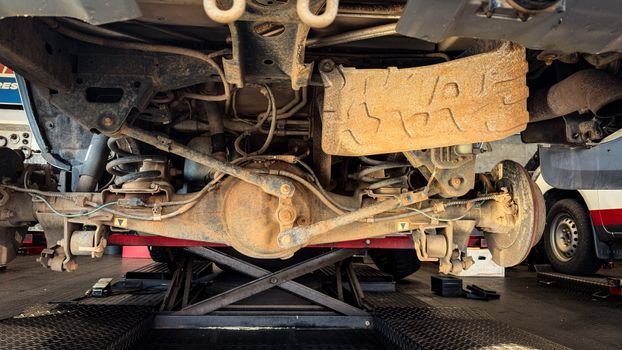
Photo: Magda Ehlers / Pexels
Before you begin any hands-on work, it's paramount to thoroughly understand the various components that make up your Jeep Wrangler lift kit. Not all lift kits are created equal; they range from basic spacer lifts to comprehensive long-arm kits, each with a different set of parts designed to achieve specific goals. A typical lift kit might include new coil springs, shock absorbers, control arms (upper and lower), track bars (front and rear), sway bar links, brake line extensions, and bump stop extensions. Some advanced kits may also feature steering stabilizers, upgraded tie rods, and even new driveline components like CV driveshafts or slip yoke eliminators, especially for lifts exceeding 3 inches. Each component plays a critical role in how your Jeep handles, both on and off-road. For instance, new coil springs directly dictate the lift height, while longer shock absorbers are necessary to accommodate the increased suspension travel. Control arms are crucial for maintaining proper axle alignment and caster angles, which directly impact steering stability. Sway bar links prevent excessive body roll, and extended brake lines ensure adequate slack during full suspension articulation. Familiarize yourself with the purpose of each part in your specific kit by carefully reviewing the manufacturer's instructions. This understanding will not only make the installation process smoother but also help you troubleshoot any issues that may arise. Knowing what each piece does will also empower you to make informed decisions if you decide to upgrade individual components later. Remember, the goal of a lift kit is not just to make your Jeep look taller, but to improve its off-road capability, ground clearance, and approach/departure angles. A well-installed kit should enhance articulation without compromising safety or driveability. For further customization options, consider exploring upgraded Jeep Wrangler axles to complement your new lift.

Essential Tools and Safety Precautions for Lift Kit Installation

Close-up of a workshop with safety gear, grinder, and toolbox on a metal surface. Photo: Anastasia Shuraeva / Pexels
A successful and safe Jeep Wrangler lift kit installation hinges on having the right tools and adhering to strict safety protocols. Attempting this project without the proper equipment can lead to frustration, damage to your vehicle, or even serious injury. Before you even think about turning a wrench, gather a comprehensive set of tools. You'll definitely need a sturdy floor jack capable of lifting your Jeep, along with at least two, preferably four, heavy-duty jack stands to securely support the vehicle. A comprehensive socket and wrench set (both metric and SAE, depending on your Jeep's year), a torque wrench (essential for tightening critical fasteners to manufacturer specifications), penetrating oil, a pry bar, a rubber mallet, and a breaker bar will be indispensable. Air tools, if available, can significantly speed up the process but are not strictly necessary. Don't forget safety glasses, work gloves, and comfortable, protective clothing. Safety should always be your number one priority. Never work under a vehicle supported only by a jack; always use jack stands. Ensure the vehicle is on a level, stable surface, and chock the wheels that are not being lifted. Disconnect the battery to prevent any accidental electrical issues. When removing springs, be extremely cautious as they are under significant compression and can cause severe injury if not handled properly. Using a spring compressor, though not always required for all lift kits, can be a wise investment for safety. Always follow the specific safety warnings provided in your lift kit's instruction manual. Read through the entire guide at least twice before beginning to ensure you understand every step and have a clear mental roadmap. Having a friend or helper can also make the process safer and more efficient, especially when maneuvering heavy components or dealing with stubborn bolts. Double-checking all connections and torque settings after installation is not just a recommendation, it's a critical safety measure.

Step-by-Step Front and Rear Axle Lift Kit Installation

Yellow Jeep navigating muddy terrain on an off-road adventure, showcasing rugged vehicle capabilities. Photo: Wallace Silva / Pexels
The installation process for your Jeep Wrangler lift kit will generally follow a similar pattern for both the front and rear axles, though specific components and clearances will vary. Let's break down the typical steps. Begin by safely lifting the front of your Jeep and placing it securely on jack stands, ensuring the axles are supported to allow the suspension to hang freely. Remove the front wheels. Disconnect the front shock absorbers, sway bar links, and track bar. You'll then carefully unbolt and remove the factory coil springs. This often requires lowering the axle slightly with the floor jack to relieve tension. Once the old components are out, install the new coil springs, making sure they are properly seated. Next, install the new, longer shock absorbers, followed by the extended sway bar links and new or adjustable track bar. If your kit includes new control arms, replace the factory ones at this stage, ensuring proper orientation. Torque all bolts to the manufacturer's specified values. Repeat this entire process for the rear axle. Safely lift the rear of the Jeep, place it on jack stands, remove the wheels, and disconnect the rear shocks, sway bar links, and track bar. Remove the old coil springs and install the new ones. Fit the new rear shock absorbers, extended sway bar links, and any other rear-specific components such as brake line extensions or bump stop extensions. Just like the front, meticulously torque every bolt to its correct specification. It's crucial to pay attention to details like brake line routing to prevent pinching or stretching, and to ensure all electrical connections are secure. After both axles are complete, reattach all four wheels, lower the Jeep slowly, and conduct a visual inspection to ensure everything is properly seated and secured. It's highly recommended to perform a 'flex test' by driving over some uneven terrain slowly or using a forklift at a professional shop to articulate the suspension and check for any binding or rubbing. For optimal performance and longevity, consider pairing your new lift with upgraded Jeep Wrangler tires designed for off-road adventures.

Post-Installation Checks, Alignment, and Common Mistakes to Avoid

A classic Jeep on a garage lift with a humorous parking sign visible. Photo: Sami Aksu / Pexels
Once your Jeep Wrangler lift kit is installed, the work isn't quite finished. A series of critical post-installation checks and a professional alignment are absolutely necessary to ensure safety, proper handling, and the longevity of your components. First, take your Jeep for a slow, short test drive on a flat, paved surface. Listen for any unusual noises – clunks, squeaks, or grinding – which could indicate loose components or interference. Perform a visual inspection after the test drive, checking all bolts and nuts you touched to ensure they are still tight. Pay particular attention to the control arm bolts, track bar bolts, and shock mounts. Examine brake lines, ABS wires, and vacuum lines to ensure they are not stretched, pinched, or rubbing against any moving parts. Check for proper clearance around tires, especially when turning the steering wheel lock-to-lock. The most critical step post-installation is getting a professional alignment. Lifting a Jeep significantly alters suspension geometry, including caster, camber, and toe. Without proper alignment, your Jeep will handle poorly, experience excessive tire wear, and potentially develop dangerous steering characteristics like 'death wobble.' Inform the alignment shop that you've installed a lift kit so they can adjust to the new specifications. Common mistakes to avoid during and after installation include: * **Not torquing bolts correctly:** Under-torquing can lead to loose components and catastrophic failure, while over-torquing can strip threads or stretch bolts. * **Forgetting to disconnect the battery:** This prevents accidental airbag deployment or other electrical issues. * **Not supporting the vehicle properly:** Always use jack stands, never just a jack. * **Ignoring brake line and ABS wire extensions:** Failure to extend these can lead to catastrophic brake failure or ABS system malfunctions. * **Skipping the alignment:** This is non-negotiable for safety and performance. * **Rushing the process:** Take your time, double-check every step, and refer to your kit's instructions frequently. * **Using incorrect tools:** The right tools prevent damage to fasteners and components. * **Not bleeding brakes (if necessary):** Some kits require disconnecting brake lines, necessitating a brake bleed afterwards. By being meticulous and patient, you'll ensure your lifted Jeep Wrangler provides years of safe and enjoyable off-road adventures.

Comparison

FeatureBasic Spacer Lift2.5-3.5" Coil Lift4+" Long Arm KitCoilover Kit
Lift Height0.75-2.5 inches2.5-3.5 inches4+ inches2.5-6+ inches
Cost (Approx)"$""$$""$$$""$$$$$"
Ride QualityMaintains stockImprovedSignificantly improvedRace-level performance
Off-road CapabilityMinor improvementGood improvementExcellent articulationMaximum articulation
Installation DifficultyEasyModerateAdvancedExpert
Required ModificationsMinimalDriveshafts/Control Arms possibleSignificant drivetrain modsExtensive chassis mods

What Readers Say

"This jeep wrangler lift kit installation guide was incredibly detailed and easy to follow. My 2018 JL looks fantastic, and the ride feels better than stock. Couldn't have done it without these clear instructions!"

Mark J. · Phoenix, AZ

"As a first-timer, I was intimidated, but this guide broke down every step. The safety tips were particularly helpful, and I now have a 3-inch lifted JK that handles trails like a dream."

Sarah P. · Denver, CO

"I followed this jeep wrangler lift kit installation guide for my 2020 Rubicon, and it saved me hundreds in labor. The advice on post-installation checks and alignment was spot on, resulting in a perfectly balanced ride."

David L. · Austin, TX

"The guide was mostly excellent, though I wish there were a few more specific torque specs mentioned for general bolts. Still, it provided a solid framework for my 2.5-inch lift, and my TJ is now much more capable."

Jessica R. · Orlando, FL

"Used this guide for a long-arm kit on my older YJ. While my specific kit had some unique steps, the foundational knowledge from this jeep wrangler lift kit installation guide was invaluable. My Jeep feels brand new off-road!"

Kevin S. · Seattle, WA

Frequently Asked Questions

How long does a Jeep Wrangler lift kit installation typically take?

For a relatively simple 2.5-inch coil or spacer lift, a DIY installation can take anywhere from 6 to 12 hours for an experienced mechanic, or 10-20 hours for a novice. More complex kits, especially those involving control arms or driveline modifications, can take 20+ hours or even multiple days.

Do I need a professional alignment after installing a lift kit?

Absolutely, yes. A professional alignment is mandatory after any suspension modification, especially a lift kit. Lifting your Jeep alters its suspension geometry, and without proper alignment, you risk poor handling, premature tire wear, and potentially dangerous steering issues like 'death wobble'.

What tools are essential for a DIY Jeep Wrangler lift kit installation?

Key tools include a robust floor jack, at least four heavy-duty jack stands, a comprehensive socket and wrench set, a torque wrench, penetrating oil, a pry bar, a rubber mallet, and safety glasses. Air tools can make the job faster but aren't strictly required.

Is installing a lift kit on my Jeep Wrangler worth the cost?

For many Jeep owners, the benefits of a lift kit—increased ground clearance, ability to run larger tires, improved off-road articulation, and an aggressive aesthetic—far outweigh the cost. The value depends on your intended use and desire for enhanced capability and appearance.

How does a spacer lift compare to a full coil spring lift kit?

A spacer lift uses pucks placed above or below your factory coil springs to gain height, typically maintaining stock ride quality. A full coil spring lift replaces the factory springs with longer, often stiffer, aftermarket springs, offering better performance, articulation, and often improved ride quality, especially off-road.

Who should attempt a DIY Jeep Wrangler lift kit installation?

A DIY installation is best suited for individuals with a good understanding of automotive mechanics, access to the proper tools, and a patient, methodical approach. If you're uncomfortable with complex mechanical tasks or lack the necessary equipment, professional installation is recommended.

Are there any safety risks associated with installing a lift kit?

Yes, significant safety risks exist if proper precautions aren't taken. These include the vehicle falling off jacks, springs under compression causing injury, and improper installation leading to steering or braking system failures. Always prioritize safety, use proper equipment, and follow instructions diligently.

What future trends are impacting Jeep Wrangler lift kit technology?

Future trends include increasingly sophisticated suspension electronics, adaptive damping systems integrated with lift kits, lighter and stronger materials, and more user-friendly, application-specific kits. We're also seeing a rise in hybrid kits that combine elements of different lift types for optimized performance.

Empower your Jeep Wrangler with the ultimate off-road advantage. By following this comprehensive jeep wrangler lift kit installation guide, you'll gain the confidence to tackle any trail and transform your ride. Don't wait – elevate your adventure today!

Topics: Jeep Wrangler lift kit installation guideinstalling a Jeep lift kitWrangler suspension upgradeDIY Jeep lift kitoff-road Jeep modification
Leo List
Brampton weed
Adultwork